Showing posts with label caramel. Show all posts

Monday, November 19, 2012

Salted Caramel Pecan Shortbread Bars

Pin It Now!

I don't really have any profound comments for this recipe, other than I just really wanted to combine pecans, caramel, shortbread and chocolate into something  delicious.  They were delicious!


I owe my mom and dad a big thank you though, because they got me a food photography "How-To" book, that I immediately read upon receiving.  I had to make something today so that I could try out all the tips, so that was really motivating my baking today.  Sadly, by the time I was done baking, I had lost almost all the daylight, but I worked with what I had, I will have more chances to practice.  It was so fun to implement what I learned, and hopefully my photos will continue to improve.

Salted Caramel Pecan Shortbread Bars

Ingredients:


Shortbread:
(Adapted from The Joy of Baking's Shortbread Cookies)
  • 1 cup (2 sticks) butter, softened
  • 1/4 cup powdered sugar
  • 1/2 cup brown sugar, packed
  • 1-1/2 teaspoon vanilla extract
  • 1-1/2 cups all purpose flour
  • 1/2 cup corn starch
  • 1/4 teaspoon salt
Caramel:
(Adapted from Chewy Caramel from All Recipes)


  • 1 cup butter
  • 1 pound light brown sugar
  • 1 (14 ounce) can sweetened condensed milk
  • 1 cup light corn syrup
  • 1 pinch salt
  • 1 1/2 teaspoons vanilla extract
Other:
  • 8 ounces roasted and salted pecan halves, broken up
  • 12 ounces semi-sweet chocolate chips
  •  course sea salt
Directions:

Shortbread:

  1. Line a 9x13 in. baking dish with parchment paper.  Make sure it extends up all four sides.  Preheat oven to 350 degrees F. 
  2. In a medium bowl  cream butter until smooth and creamy.  Add sugars and cream together for another minute, until smooth.  
  3. Add the vanilla and beat until incorporated well.
  4. Add the flour, corn starch, and salt and mix until just combined.
  5. Using your hands or a spatula, press the dough into the prepared pan until it is evenly distributed.  
  6. Bake for 18-22 minutes, until lightly golden.
Caramel:
  1. While the shortbread cookies, in a heavy bottomed saucepan over medium heat, combine the butter, brown sugar, sweetened condensed milk, corn syrup and salt. Bring to a boil, stirring constantly. Heat to between 242 and 245 degrees F.  Cook for 2 minutes at that temperature. Remove from the heat and stir in vanilla.    
Assembly:
  1.  Once the shortbread is out of the oven and has cooled slightly, evenly distribute the pecan pieces over the entire shortbread.
  2. Once the caramel is done, poor it evenly over the pecans/shortbread, making sure all of it is covered.
  3. Sprinkle the chocolate chips over the entire caramel surface and allow to sit until they all turn shiny, which means they have melted.  Once they have melted, use a knife or offset spatula and evenly coat all the caramel with the chocolate until none of the caramel can be seen.
  4. Allow to cool on the counter for several hours, sprinkle lightly with coarse sea salt,and then place in the fridge for 30-45 minutes, just until the chocolate hardens.
  5. Remove from fridge, lift out using the parchment paper and place on a flat surface.  Using a large, sharp knife, cut in to approximately 72 pieces (6 rows by 12 rows).
  6. Enjoy or put in fridge to continue to set up.  Store in refrigerator.    

Tuesday, October 30, 2012

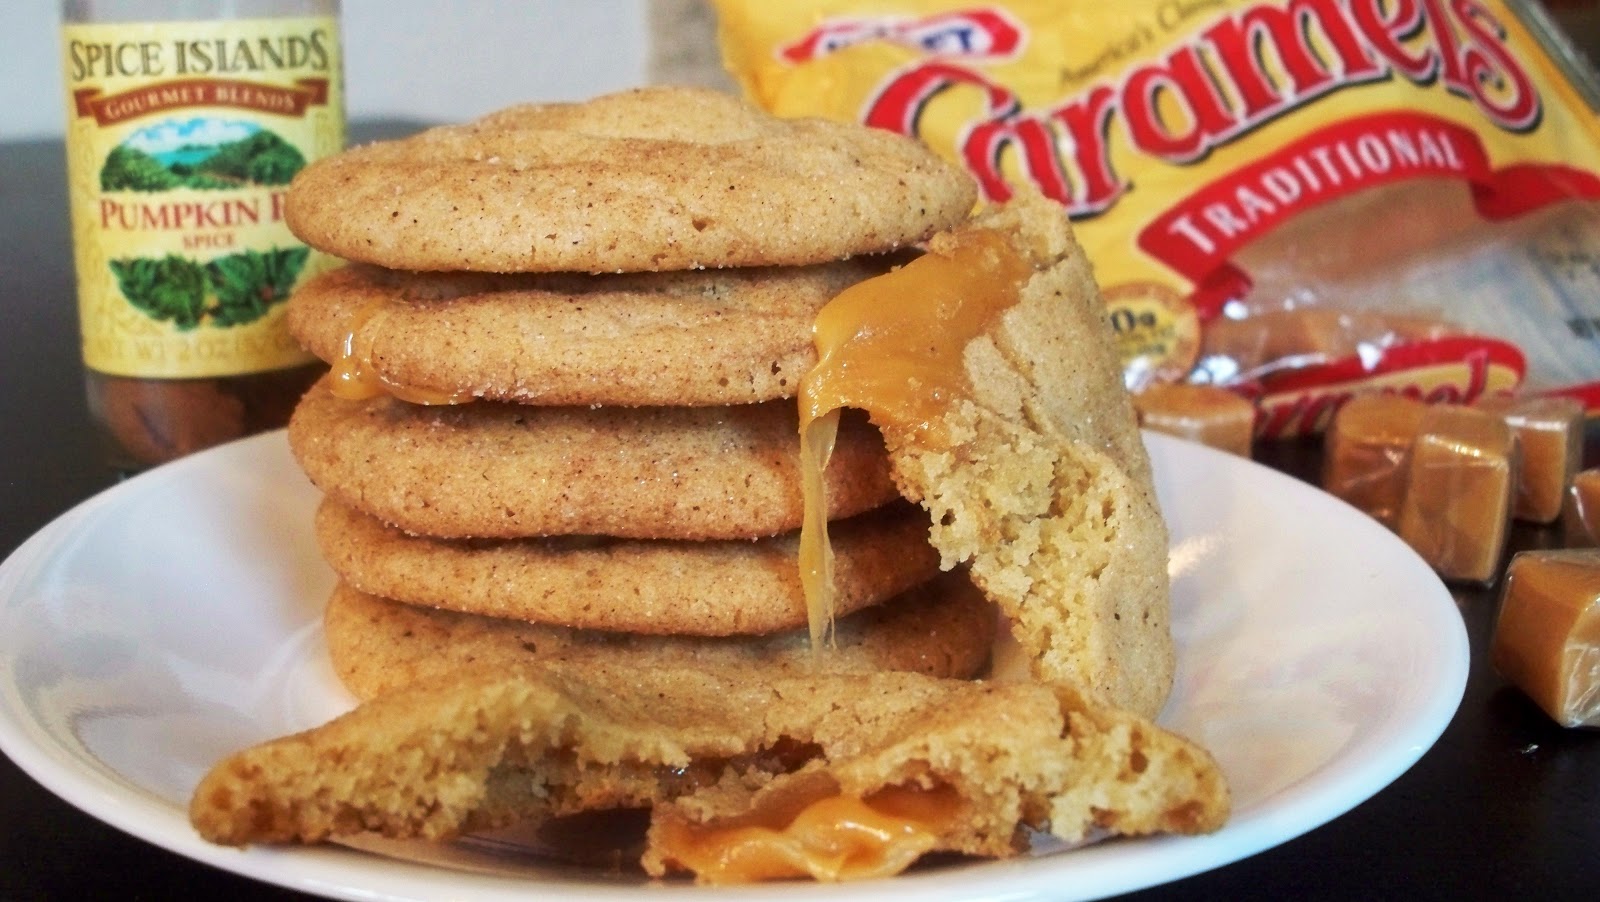
Caramel Filled Pumpkin Pie Spiced Snickerdoodles

Pin It Now!

One of my favorite cookies are snickerdoodles.  I am the biggest cinnamon-sugar fan out there.  Second favorite non-chocolate thing?  Caramel!  So, naturally, why not combine the two?  And, to get in the holiday spirit, I thought some pumpkin pie spice might be a nice twist on the traditional cinnamon spice.  There is a secret ingredient in these too--brown sugar!  Yep, gives them a lovely chew, and a deeper flavor.  Can not go wrong with these, they are crispy on the edge, chewy on the inside, and caramelly goodness in the center.  These are pretty large cookies, and very satisfying.  I think these will be on my Thanksgiving menu for sure!!


Caramel Filled Pumpkin Pie Spiced Snickerdoodles
(Snickerdoodle recipe adapted from Better Homes and Gardens 75th Anniversary cook book)

Makes 36 large cookies

Ingredients:
  • 1 cup butter, softened
  • 1 cup granulated sugar
  • 1 cup brown sugar
  • 1/2 teaspoon baking soda
  • 1/2 teaspoon cream of tartar
  • 2 eggs
  • 1 teaspoon vanilla extract
  • 3 cups all purpose flour
  • 1/2 cup granulated sugar
  • 1-1/2 teaspoons pumpkin pie spice
  • 36 Kraft caramels, unwrapped
 Directions:
  1. In a medium mixing bowl beat butter with an electric mixer on medium to high for 30 seconds.
  2. Add the 1 cup granulated sugar, brown sugar, baking soda, and cream of tarter and beat until combined, scraping down sides occasionally.
  3. Beat in eggs and vanilla until combined well.
  4. Beat in the flour until well combined.
  5. Cover the dough and refrigerate for 15-60 minutes, or until easy enough to handle.  
  6. Preheat oven to 375 degrees F and line a baking sheet with parchment paper.
  7. Mix the 1/2 cup granulated sugar and the pumpkin pie spice in a small bowl.  Using a 1-1/2 tablespoon cookie scoop, scoop out a level scoop full of dough and place the ball in your hand.  Gently flatten the dough and place a caramel in the center.  Wrap the dough around the caramel completely, and finish rolling it in to a round ball.  Roll in the spice and sugar mixture to coat, and place on a cookie sheet lined with parchment. Place 9 cookies on a sheet at a time, spacing them evenly.
  8. Bake for 11-12 minutes, or until the edges start to brown.
  9. Let cool on the parchment until the caramel is solidified a bit before transferring to a cooling rack.

Monday, August 27, 2012

Party Caramel Apples: Recipe and How to

Pin It Now!

First, A Story of Failure (Learn from My Mistakes)

For my son's 3rd birthday party I had it in my head that I had to make caramel apples.  Had to be homemade, had to have chocolate, and I had to make them for the party.  No negotiating, I just had to make them.  In preparation for making them, I tried a few caramel recipes.  The first recipe I tried  smelled good, went on the apples well enough, but when it hardened, it turned into a grainy disaster, that crumbled when you bit, pulled, or chewed it, instead of being that wonderful chewy caramelly goodness.

They look ok, the ones that the caramel actually stayed on, but they had an awful texture.
 I wasn't sure what I had done wrong.  I didn't have corn syrup when I made this batch (one of the main ingredients), so in my infinite wisdom I looked it up on the internet how to substitute it, and the site I looked at said just add x amount of sugar and y amount of water in place of the corn syrup called for, and it will be all good.  Upon further reflection, and research, after this bombed batch, I found out that the site left out something important about subbing that for corn syrup:  the very important part about boiling those to things to a softball stage and THEN adding it to the other ingredients in place of corn syrup.  Anyways, two lessons learned: 1) don't believe every substitution you see on the internet. 2)  Just go out and by an ingredient if it is going to be that crucial to success.  When making candy, I have decided that there are some substitutions that can't be made, it is too much chemistry dependent.


On to the Party Caramel Apple Success and Recipe

Ok, enough blabbering about my first epic caramel fail.  I went back to the drawing board the next morning (literally got up uber early and set out to try again, I don't like to fail), and tried for redemption.  Correct ingredients in hand this time, I made another batch, and it came out beautiful!  Best caramel ever!  I made half a batch so I wouldn't waste ingredients if it was a failure, and I made them into little caramels that I wrapped up (didn't have any more apples, as I had wasted them all the night before).  Delicious!  This is the recipe I ended up using to make the caramel apples.

If you are going to wrap them up and give them as party favors like I did, I have included the items to do that.  They were the cutest party favors ever, everyone loved them, and I would do it again in a heart beat!  These would also be wonderful for halloween parties, just melt some orange candy melts instead of the white chocolate. If you end up having extra caramel left after you dip them all, line an 8x8" baking pan with parchment paper and just pour it right in and stick it in the fridge to firm up.

IF YOU LIKE THIS RECIPE, PLEASE DON'T FORGET TO PIN IT :)

Party Caramel Apples

Ingredients:

Caramel:
(Adapted from Chewy Caramel from All Recipes)
  • 1 cup butter or margarine
  • 1 pound light brown sugar
  • 1 (14 ounce) can sweetened condensed milk
  • 1 cup light corn syrup
  • 1 pinch salt
  • 1 1/2 teaspoons vanilla extract
Apples:
  • 12 medium-large tart-sweet apples like grannysmith
  • 12 bamboo caramel apple sticks (Michael's craft store)
Chocolate Drizzle:
  • 8 oz semi sweet chocolate chips
  • 8 oz white chocolate chips
Equipment:
  • Parchment paper
  • Candy thermometer
  • Clear plastic goody bags (Michael's craft store)
  • Cookie sheet tray
 Directions:

Apples:
  1. Prep the apples first thing.  Wash all apples well with dish soap or veggie cleaner, rubbing and rinsing well to get off the wax coating.  Dry the apples very very well.
  2. Place on a parchment lined cookie sheet tray and push a bamboo stick into each apple, parallel to the stem and right next to it as well.
Caramel:
  1. In a heavy bottomed saucepan over medium heat, combine the butter, brown sugar, sweetened condensed milk, corn syrup and salt. Bring to a boil, stirring constantly. Heat to between 242 and 245 degrees F.  Cook for 2 minutes at that temperature. Remove from the heat and stir in vanilla. 
  2. Let the caramel cool until it thickens slightly.  If you dip the apples in it while it is nuclear hot, it will just run right off onto the pan.  When it has thickened, take an apple and while tilting the pan with the caramel a bit,  spin the apple in the caramel until all the sides and most of the way up has been coated.
  3. Remove the apple from the caramel and give it a few spins and twist to allow any excess caramel to drip off.  Place back on the parchment paper lined tray and repeat with remaining apples.  If the caramel starts to get to stiff, but back on the stove on low, stirring, until it loosens up again.
  4. There will probably be bubbles that start to form on the apples, don't panic, the apples give off gasses that cause them, nothing is wrong.  Since it is being covered with chocolate, no one will even see.  If it really bugs, then use a toothpick and pop the bubbles if you would like.
  5. Let the apples harden at room temperature or in the fridge if you have room.
Chocolate and Decorating:
  1. When the caramel is almost done setting up on the apples, place the semi sweet chocolate in a microwave safe bowl and microwave in 30 second increments, stirring in between until melted.  Repeat in a separate bowl for white chocolate.
  2. In a sandwich size ziploc bag, pour the semi sweet chocolate in, twist the top closed, invert, and cut an 1/8 inch off the corner of the bag.  Drizzle the chocolate over the tops of the caramel apples, I used a swooping kind of motion, like making a cursive W all around the top.
  3. Repeat this same ziploc and drizzle procedure with the white chocolate.
  4. Once all the apples have been decorated, place in fridge and allow the chocolate to set up completely, usually an hour or two.
  5. Once it is set up, the apples can be  placed into the clear goodie bags, secured with the accompanying twist tie.
  6. I had printable stickers for my son's birthday theme (Curious George), so I stuck ones on that said "Thank you" so they would know it was a party favor for coming.  Worked great!
 
Finished party caramel apples.  Loved them!

Saturday, August 18, 2012

Personal Apple Pie Cheesecakes with Caramel Sauce

Pin It Now!

Warning:  I am pretty darn proud of how these turned out, so I am going to shamelessly photo-bomb this post with pictures of the cheesecake.  You have been warned.  You will either need to deal with it or stop reading it right now :)

All right, now that is out of the way.  

I warned you....Lots of pictures :)
This weekend is my mother-in-law's birthday.  Her favorite dessert as far as I have been informed of is cheesecake.  Sadly, since that is the case, I usually make her the same cheesecake every year.  This year, I decided to take the extra time and rack my brain for any variations on cheesecake that I thought would make it a little bit more special for her.  I knew she liked caramel, and apple pie, so I thought about how I could integrate those things into her favorite dessert, and still have it be something that would turn out OK.  This is what I came up with.  Not too shabby if I do say so myself.  I like to make things so that she can freeze them or partition then out so that it lasts longer, so I thought I would find another use for my wonderful King Arthur Flour hamburger bun pan (which I LOVE), and make personal size cheesecakes in it.  Since it isn't a spring form pan, I cut strips of parchment paper and laid two crossed over each other in each well of the pan for (hopefully) easy removal.  See the picture below. 

Love love love my King Arthur Flour hamburger bun pan.  Nothing sticks and it cooks beautifully and can be used for so so so many things!
Close up of the parchment tabs and cooked cheesecake.

This is what they looked like after they were baked.  I stuck them in the fridge after they cooled on the counter for a while, and when I tried to pull one out this morning, I just lifted by the parchment paper pieces and it came right out.
When life hands you extra cheesecake batter....for goodness sake don't waste it! Make more crust and bake it in something!
It ended up making so much filling that I quickly made a second batch of crust, did the same thing with a 9" round cake pan (once again, not a spring form, so I used parchment strips, just a lot more of them), and ended up dumping the rest of the batter in to this.  It was exactly the perfect amount.  As you can tell, this makes a ton, but it will depend on what you decide to bake it in.

I know cheesecake can be intimidating, but I promise, it is fairly forgiving, specially if you are not  concerned with a little cracking on top, which will not affect flavor in any way.  Give it a try, it is worth it.  I will give some notes on different pan ideas at the end of the recipe, and a few different baking options depending on the pan you use. 

If You Like It, Please Pin It!

Personal Apple Pie Cheesecakes with Caramel Sauce
(This recipe will make 12 personal size ones done in a hamburger bun pan that has 1 1/2" deep wells that are 4" across)*

Ingredients:

Crust:
  •  4 cups ground graham crackers (about 1 box)
  • 1 tsp cinnamon
  • 2 sticks of butter (1 cup)
  • 3 Tbs granulated sugar
Filling:
  • 2 (8 oz.) blocks neufchatel cheese (light cream cheese), softened
  • 3 eggs, room temperature
  • 2 cups fat free plain greek yogurt
  • 1 tsp. ground cinnamon
  • 1/2 tsp. vanilla extract
  • 1/4 tsp. ground nutmeg
  • 1 cup granulated sugar
  • 1 can apple pie filling
Caramel Sauce:
  • 1 1/2 cups granulated sugar
  • 1/4 cup water
  • 3/4 cup 2% evaporated milk
  • 1/2 tsp vanilla
Directions:

Crust:
  1.  Preheat the oven to 325 degrees F.
  2.  In a mixing bowl, combine the ingredients with a fork until evenly moistened. Lay two parchment strips across each other in each well of the pan to form an X.
  3. Spoon the crumbs into the pan wells and, using the bottom of a measuring cup or the smooth bottom of a glass, press the crumbs down into the base and up the sides (the paper may curl in on it, but once you get the crumbs pressed in, it should hold the paper open more). 
  4. Bake in oven for 6 minutes.  Remove and let cool slightly. 
  5. Place about a tablespoon of apple pie filling in the bottom of each well, on top of the baked crust, and spread to cover the bottom.
Filling:
  1. In  a large bowl, using a hand mixer, beat the neufchatel cheese on low speed for 1 minute until smooth and free of any lumps. Add the eggs, 1 at a time, and continue to beat slowly until combined. Gradually add sugar and beat until creamy, for 1 to 2 minutes (the higher speed you beat it on, the lighter the cheesecake will be, so if you want a dense cake, beat on low speed for the minimum amount of time needed to fully incorporate ingredients)
  2. Add greek yogurt, cinnamon, nutmeg, and vanilla. Mix well.  Periodically scrape down the sides of the bowl and the beaters. The batter should be well-mixed but not over beaten. Pour the filling into the apple pie filling covered, crust-lined pan wells, most of the way full.
  3. Place in oven.  Bake for about 30 minutes. The cheesecake should still jiggle in the center just a bit (it will firm up after chilling), so be careful not to overcook.  Remove from oven.  Let cool in pan for 30 minutes. Chill in the refrigerator, loosely covered, for at least 4 hours. Remove from pan by lifting the cheesecake out by the parchment strips slowly and gently.
Caramel Sauce:
  1. Place sugar and water in a medium sauce pan and bring to a boil heating on high. 
  2. Boil on high until the sugar dissolves and eventually turns a deep amber color, swirling occasionally to distribute the color, but do not stir. About 10-12 minutes
  3. Once desired color is attained, remove from heat and CAREFULLY add the evaporated milk.  It will boil violently, release hot steam, and sputter, so be carefully and add slowly.  Stir constantly until all the milk is added and it has stopped boiling and is well incorporated.  Add vanilla and mix.
  4. Let cool in pan.  Once it is cool enough to handle, spoon over refrigerated cheesecake as desired.  
  5. Store remaining in fridge in air tight container for up to a week.  Reheat in microwave to make it pourable.
Rarely, if ever, have I had pictures come out of my food that I like.  I like.


*Notes:
  • If you don't have a deep welled hamburger bun pan, similar sized ramikins can be used.  Use the same parchment paper technique for easy removal.  Regular sized muffin pans can be used too, it will probably make about 24 of them.  Two 9" cake pans (about 2-3" deep) can also be used.  When filling up anything for cheesecakes, it will rise so do not fill all the way to the top.
  • The 9" cake pan baked for about 45-50 minutes, if you decide to go that route.
  • If you have a spring form pan, by all means, use it.  You can cut the crust recipe in half if you have a 9 or 10" spring form pan and just want to make one large cheesecake.
  • I know the best way to bake a cheesecake is to do it in a water bath, but I did not have a pan that would fit my hamburger bun pan in so I opted to do the method of baking at a slightly lower temperature.  The personal sized cheesecakes had no cracking problems on top what so ever.  The large one started cracking on the top around the edges slightly by the end, but after it cooled, they sealed up and you can't tell.  We are smothering it with caramel sauce, so what difference does it make anyways?  The cheesecake came out wonderfully creamy, so if you don't have a pan for a water bath, don't worry.  I am trying to make this as user friendly as possible.
  • If your dissolved sugar mixture is really grainy by the time it starts to get some color, add 1/2 cup of water to it and stir to dissolve the sugar, return to a boil and continue with the recipe.  You can also add a bit of corn syrup to help also. 
  • If you have never made a cheesecake, they look a bit undercooked when they are done, a bit wiggle still in the center.  It is ok.  It will set up in the fridge the rest of the way.  Just make sure it wiggles like jello, and not like a bucket of water being shaken (too loose).
  • This cheesecake is much lower in fat and calories than regular cheesecake so it will be creamier band lighter.  Less guilt on going back for seconds I say!

Last one, I promise.
 Feel free to leave any questions in the comments section.  If I don't have an answer, I will try to find it for you from someone else who does.

Enjoy, and let me know if you make it how you like it!


Thursday, June 28, 2012

Chocolate Covered Apple Pie Caramels

Pin It Now!

I know I know, my pictures suck.  I am working on it, and they will hopefully get better soon. 

Now that that is out of the way, here is a new recipe I found from Blondie's Cakes called Apple Cider Caramels.  Could it be, the best of both worlds, together in one??  Yep!  After days of having this web page open on my computer...taunting me, I finally gave in last night and had to make them.

After a long time over the stove stirring, I was well rewarded.  These little caramel gems taste like apple pie, stuffed in a chewy, rich caramel.  That is all well and good, but I thought it could be better.  So I dipped them in semi-sweet chocolate too.  Now are are talking apple pie meets chocolate and caramel covered apple.  Happy, happy day!  I covered half, left the other half naked, and I enjoy them either way.  This is definitely going in my holiday/special occasion recipe folder, because it just screams happy holidays! (Hey, fourth of july is a holiday, right?  Close enough.)

I modified the recipe ingredients a bit from the original, so here it is with the modifications.

CHOCOLATE COVERED APPLE PIE CARAMELS


Ingredients:

1/3 cup frozen apple juice concentrate, thawed
1 cup evaporated milk, 2%, divided (2/3 cup and 1/3 cup)
1 tsp ground cinnamon
Pinch nutmeg
1/4 tsp allspice
1 1/2 cup brown sugar
1/3 cup light corn syrup
1/2 cup real butter, cubed

Chocolate coating (to cover whole batch):

12 oz. semi-sweet, dark, or milk chocolate chips
1 tbs butter

Directions:


- Line an 8" square pan with parchment paper, making sure to leave about 1" hanging over the edges for easy removal.

- In a small bowl, combine 2/3 c. evaporated milk, cinnamon, nutmeg, allspice, and apple juice concentrate. Set aside.

- In a large, heavy saucepan, combine the sugar, 1/3 c. evaporated milk + enough water to reach the 1/2 c. line on the measuring cup, and corn syrup. Cook over low heat until the sugar dissolves. Insert the candy thermometer and simmer until the syrup reaches 234 degrees.

- Remove from heat and slowly whisk in the cream mixture. Add the cubed butter and stir until the milk and butter are fully incorporated. Return the pan to heat and re-insert the candy thermometer. Cook over low heat, stirring frequently, until the temperature reaches 246 degrees.

- Remove from heat and pour the caramel into the prepared pan. Let the mixture cool completely at room temperature or in the refrigerator. I covered the top of the pan loosely with saran wrap. I cut it into 64 squares.  Wrap each in wax or parchment paper and store in fridge, leave unwrapped in an air tight container in the fridge, cover in chocolate* and store in the fridge, whatever floats your boat.  Stores in fridge up to two weeks.

*To cover in chocolate, cut into desired sizes once cool.  Melt the coating ingredients together in 30 second intervals in the microwave until melted.  Using two forks, dip caramels in the chocolate and place on a parchment lined baking sheet.  Refrigerate until the chocolate sets.  Store in fridge.


Nutrition information (uncovered caramels, 64 servings)

  Calories-48  Carbs-9    Fat-2 g    Protein-0g


Saturday, June 23, 2012

Redemption: Homemade Chewy Caramels

Pin It Now!

So after an incredible fail yesterday, I got up early and tried to tackle this one more time.  After an hour of undivided attention and stirring, here is the finished product.  And it was a success!!!  THIS is the caramel that the beloved caramel apples from somewhere like Oak Glen are covered in.  Now that I know how to do it, I will be going back to the caramel apple drawing board.  

But what to do with this pile of chewy caramels I have sitting on my counter???  Oh well, I am sure I will figure something out. 

Friday, June 22, 2012

Trial and Error...

Pin It Now!


Ok, I am a caramel lover.  I thought it would be so great if I could conquer the caramel apple.  I would be making them all the time if I did.  So today I tried.  And failed. 

I researched, and studied and read comments.  To no avail. I made the caramel, it looked beautiful, I thought I just hit one out of the part...and then it cooled.  Into a grainy mess of caramel crumbs. I was left with six pretty, yet non-caramelly apples, and an 8x8 pan of not chewy caramel.  Tear... So, now it is back to the drawing board.  More research, and more reading.  Hopefully next attempt will be more successful. 

Word to the wise.  Sugar, water and a pinch of cream of tarter is apparently NOT a good enough substitute for light corn syrup, in spite of what anyone says. 


Related Posts Plugin for WordPress, Blogger...